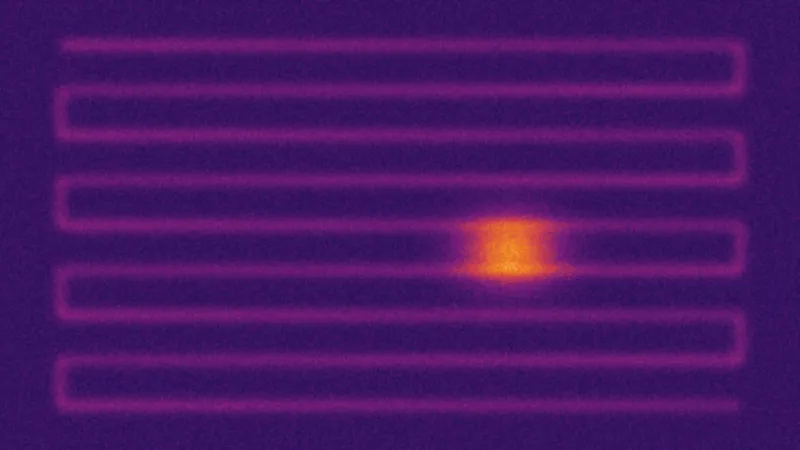
Falling boiler pressure, more and more frequent top-ups, a patch of floor that is unusually warm or damp: a leak in underfloor heating is worrying because the pipes are buried in the screed. Before opening the floor, a thermal camera can trace the network and narrow the suspect area down to a few tens of centimetres.
Why warm-up is decisive
Underfloor heating that has been running for hours is almost uniform: heat has spread through the whole screed. Pipes no longer stand out, and a hot water leak blends into the rest. When heating starts on a cold floor, however, hot water first warms the strip of screed just above the pipes. The loop then shows clearly before the heat spreads.
A leak changes this progression. Escaping hot water soaks the screed around the break and forms an irregular hot spot, wider than a pipe, that grows minute by minute. That signature, described in camera manufacturers’ guides, is what you are looking for.
Step-by-step method
- Let the floor cool. Switch off heating to the area several hours beforehand, ideally the evening before, to start from an even floor.
- Prepare the room. Remove rugs and furniture, close shutters if the sun hits the floor, keep stray heat sources away.
- Take a reference image. Before restarting, capture the cold floor: it will help rule out spots unrelated to the loop.
- Restart heating at a high temperature. Run the relevant loop with water as hot as the system allows.
- Watch from the first minutes. Flow lines appear first, then the loop takes shape. Depending on screed thickness and floor covering, this takes from a few minutes to half an hour.
- Repeat images at regular intervals. Roughly every five minutes, from the same spot and with the same span. A leak shows as a spot that widens faster than the pipes.
- Confirm before breaking anything. Cross-check with the pressure drop, a moisture reading of the floor covering or a leak detection specialist.
The right settings
A manual, tight temperature span
In automatic mode, the camera constantly rescales its colours, making images impossible to compare. Lock the span around the floor temperature, for example over about ten degrees, and keep it for the whole series.
Floor covering emissivity
Matte tile, stone and concrete have high emissivity, around 0.9 and above, so readings are reliable. Very glossy tile reflects windows, lights and the operator. Change your angle to check that a spot does not move with you.
A readable palette
A gradient palette such as “iron” brings out warm lines well. Rainbow palettes create artificial boundaries that can look like anomalies.
The floor covering changes everything
| Covering | Pipe visibility | Notes |
|---|---|---|
| Tile, stone, polished concrete | Very good | Sharp, fast signature; watch for reflections on glossy surfaces |
| Thin engineered wood, laminate | Good to fair | Blurrier signature, slower to appear |
| Thick solid wood | Fair to poor | Widened lines; a leak is hard to tell from a pipe |
| Carpet, rugs | Poor | Remove before inspection if possible |
Which camera for this job
Underfloor heating pipes are several centimetres apart, often 10 to 20 cm (4 to 8 in). There is no need for very high resolution: at 2 m (6.5 ft), a 256 × 192 camera with a common field of view covers less than a centimetre of floor per pixel. Check your own case with our spot size calculator.
What matters more:
- good thermal sensitivity (NETD), to follow the spot spreading from the very first degrees;
- a manual temperature span;
- a field of view wide enough to cover a room from a stepladder or mezzanine;
- radiometric image recording, to compare the series afterwards.
Our moisture and leak detection guide and the selector will help you find a suitable device. For other leak signatures, read also how to detect water leaks with a thermal camera.
The most common pitfalls
- Inspecting a floor already at steady state: everything is lukewarm and nothing stands out.
- Mistaking a manifold or flow area for a leak: several pipes packed close together near the manifold naturally form a warm zone.
- Confusing a sunny patch or an appliance with an anomaly: the cold reference image helps rule them out.
- Leaving the span on automatic and comparing images with different colour scales.
- Breaking the floor based on a single image: a leak is confirmed by how it evolves and by other evidence.
The same principle applies to electric underfloor heating: during warm-up the cables show up, and a break in a warm line can point to a damaged cable. For any work on an electrical circuit, call a qualified professional.
Frequently asked questions
Can a thermal camera see underfloor heating pipes?
Yes, during warm-up. When heating starts on a cold floor, hot water first warms the screed above the pipes, which draws the loop on the surface.
What does an underfloor heating leak look like on a thermal image?
Usually an irregular hot spot centred on a pipe that spreads over time, while the rest of the loop keeps sharp lines.
What camera do I need for underfloor heating?
Modest resolution is often enough because pipes are several centimetres apart. Good thermal sensitivity and a manually adjustable temperature span matter more.
Does it work under wood flooring or carpet?
Less well. Tile and stone conduct heat well. Thick wood, carpet or rugs attenuate and spread the signature, which becomes blurry and slower to appear.
Sources
- TESTO Practical guide to thermography in heating (PDF, in French)
- FLIR Can Thermal Imaging See Through Walls?
Thermography locates a suspect area without demolition. It does not replace a pressure test or a professional before a screed is opened.